Undervolting is something I’ve been ignoring for a long time on my GPU. In recent times, with the GPU shortage and the need to hold on to our PC parts for longer, undervolting is becoming more important. It helps reduce heat and makes the components last longer, and in some cases can even improve performance.
I will cover how I undervolted my GPU on both Windows and Linux, and the performance improvements I got from it.
How undervolting works
A GPU will usually run at a stock speed that it is designed for. During intense operations such as gaming or rendering, it will normally boost its clock speed to improve performance, and it does this by increasing the voltage drawn. That in turn increases heat and power consumptions.
However, the stock voltage is often higher than what is actually needed for the GPU to run at that speed. By undervolting, you reduce the voltage supplied to the GPU.
The idea is to find the lowest voltage at which the GPU can still run at the desired clock speeds.
As a benefit, because it reduces heat and power consumption, it allows the GPU to boost higher clock speeds for longer periods of time. In some cases, it’s even possible to go a little higher on the clock speeds while still using less voltage, which is a performance improvement for free.
Windows - use MSI Afterburner
For Windows, the standard way to undervolt is to use MSI Afterburner. It is a free tool that allows adjusting the voltage and frequency of GPUs, and it works with most GPUs.
Every card series will have its own best undervolting settings, and so the best way I’ve found to configure MSI Afterburner is to find a thread or YouTube video with the same card undervolting it and following the steps there.
This is the video I used for undervolting an RTX 5080. It’s worth watching just to see the process and understand how undervolting works in general. The gist is to run a benchmark tool, adjust the voltage curve in Afterburner as shown, and ensure the benchmarks are still running stable.
Notice that the first part of undervolting is just reducing the voltage but keeping nearly the same clock speeds.
Here is the curve I ended up with after following the video and benchmarking for stability. Pay attention to the point at which the curve is flattened.
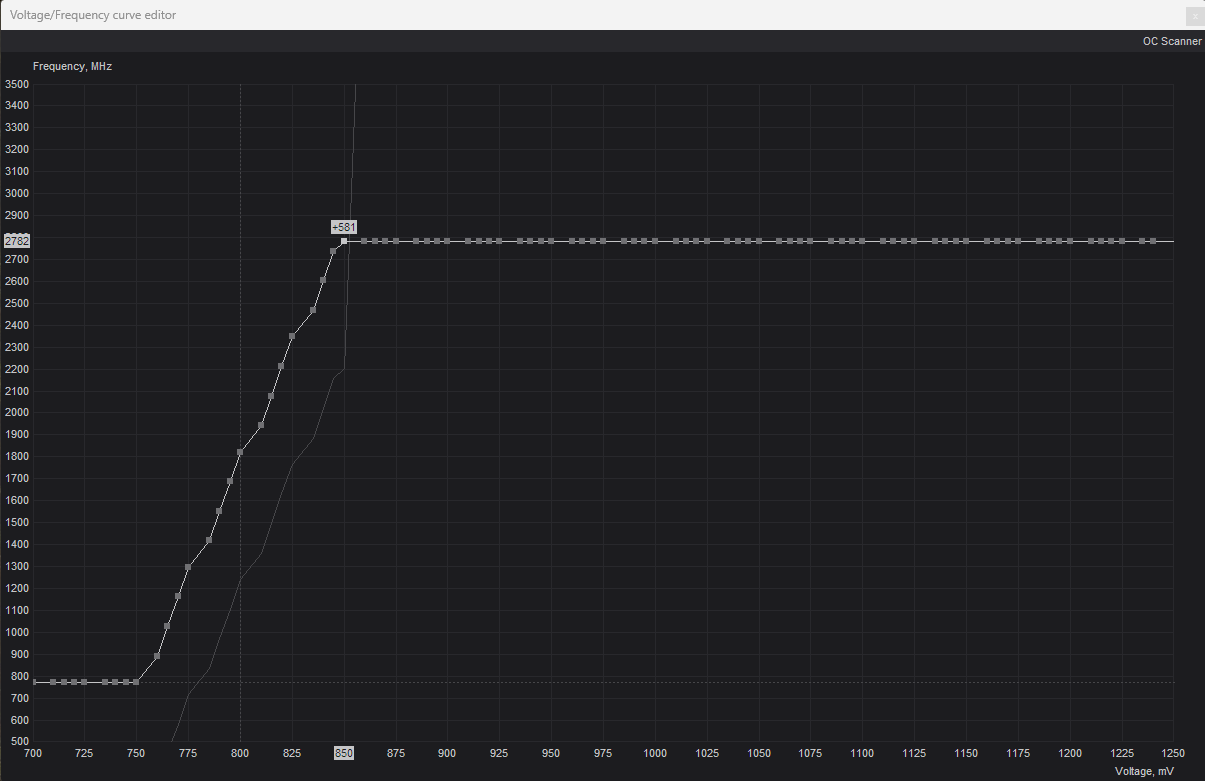
From the screenshot it can be seen: 2782 MHz clock frequency, at 850 mV. This is a +581 MHz boost in clock speed for free, and with a much lower voltage than the stock 1.05 V.
In the main MSI Afterburner window I have set the memory clock to +2000.
Linux - use LACT
LACT is a control application for Linux that allows monitoring as well as adjusting the voltage and frequency of AMD and NVidia GPUs, but it has a different approach that needs a bit of ‘translation’.
In Afterburner, the process was to adjust the clock speed (frequency) and voltage which results in a nice offset (boost).
In LACT, there isn’t a voltage to adjust, so we adjust the clock speed (frequency) and offset (boost), which results in a nice voltage reduction. Similar goal, but different things to adjust.
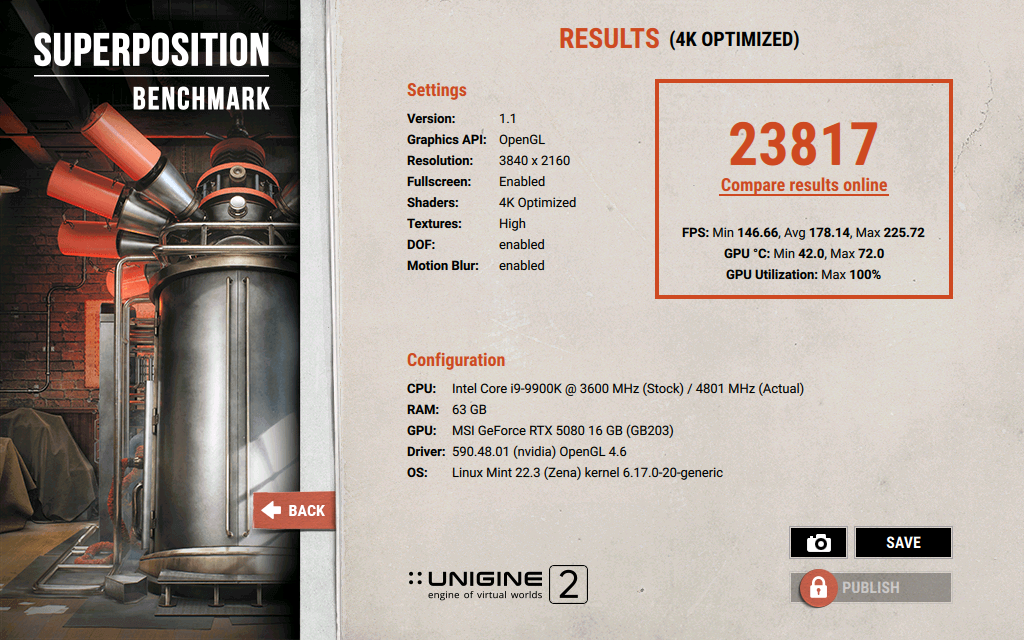
The process is similar. Run a benchmark tool, such as Unigine Superposition, and get the baseline score.
In the LACT interface (using my numbers above as an example):
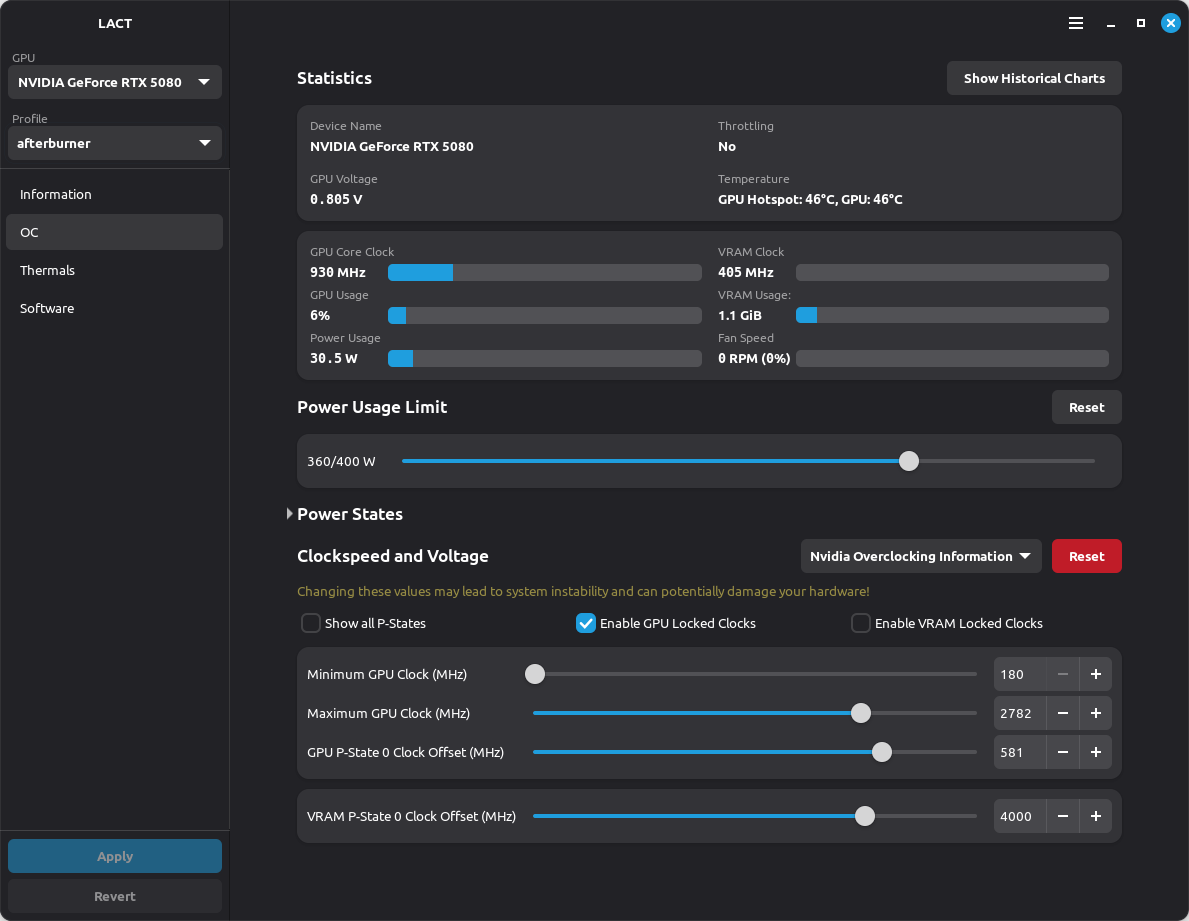
- Check the ‘Enable GPU Locked Clocks’ option
- Set the ‘Maximum GPU Clock’ to the desired frequency:
2782 MHz - Set the GPU P-State 0 Clock Offset to the desired boost:
+581 MHz - Set the VRAM P-State 0 Clock Offset to double the memory clock:
+2000 MHz * 2 = +4000 MHz
That last line requires explanation: GDDR memory is “Double Data Rate” which means it transfers data twice per clock cycle. MSI Afterburner displays the effective transfer rate (doubled), while LACT uses the actual memory clock frequency in MT/s (MegaTransfers per second). Therefore, to match MSI Afterburner’s +2000 MHz in LACT, I needed to set +4000 MHz.
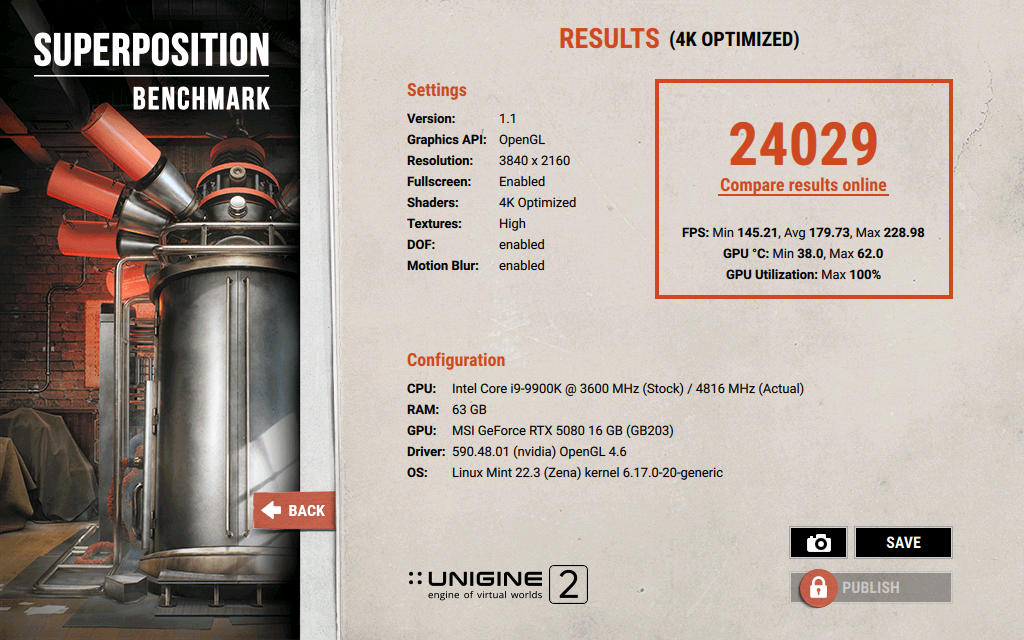
Here’s a before and after of the benchmark score, showing like for like performance. Under default settings, the GPU consumed 350W and ran at 72°C; after undervolting it consumed 250W and ran at 62°C, while maintaining the same performance.
Other notes
The undervolting settings aren’t written to GPU. Both MSI Afterburner and LACT run services that run in the background, and apply the undervolting settings when they are running. It’s important to let them start on boot to ensure you get the benefits of undervolting.
LACT does have its own MSI Afterburner style curve editor, but it is marked as ‘at your own risk’ because it’s using a reverse engineered set of undocumented NvAPI queries.
There’s a thread on the LACT Github repo discussing various undervolting settings, also a useful reference. That thread is how I understood the ‘translation’ needed between Afterburner and LACT.