Here I will go over a Terraform script to help with running a cheap Selenium Grid, in an AWS ECS cluster, with the containers managed by Fargate Spot instances. To put it in a simpler way, this Selenium Grid (hub and nodes) runs in Docker containers, the containers are run on an ECS Cluster. Within ECS, the containers are managed by Fargate, which immensely eases the running of containers from your perspective - you don’t have to specify instance details, just tell it how much CPU/RAM you need. And the backing type that we’ll make Fargate use here is Spot instances. Spot instances are unused EC2 capacity that AWS offers cheaply, with the caveat that there is a small chance of your instance being reclaimed with a 2 minute notice.
The combination of ECS with Fargate and Spot is good for fault tolerant workloads. Selenium Grids are a great fit as you can just run it in this setup without having to think too much. If a container is ever removed, Selenium Hub will simply continue farming out instructions to the remaining nodes. If you ever need the full capacity back, simply destroy and recreate the cluster. This is much cheaper compared to running such a set up on a fleet of dedicated EC2 instances.
And importantly, it makes your testers happy.
Instructions
Modify the corresponding variable values at the top of the Terraform file and put these values in from your own AWS account:
vpc_id: The VPC ID where the containers are to be createdsubnet_private_ids: The subnet ID of a private subnet in your VPC - this is where the containers will gosubnet_public_ids: The subnet IDs of public subnets in your VPC - this is where the load balancer will goyour_ip_addresses: You can use the default for experimenting, but change it to your IP address.
Once that’s done,
terraform init
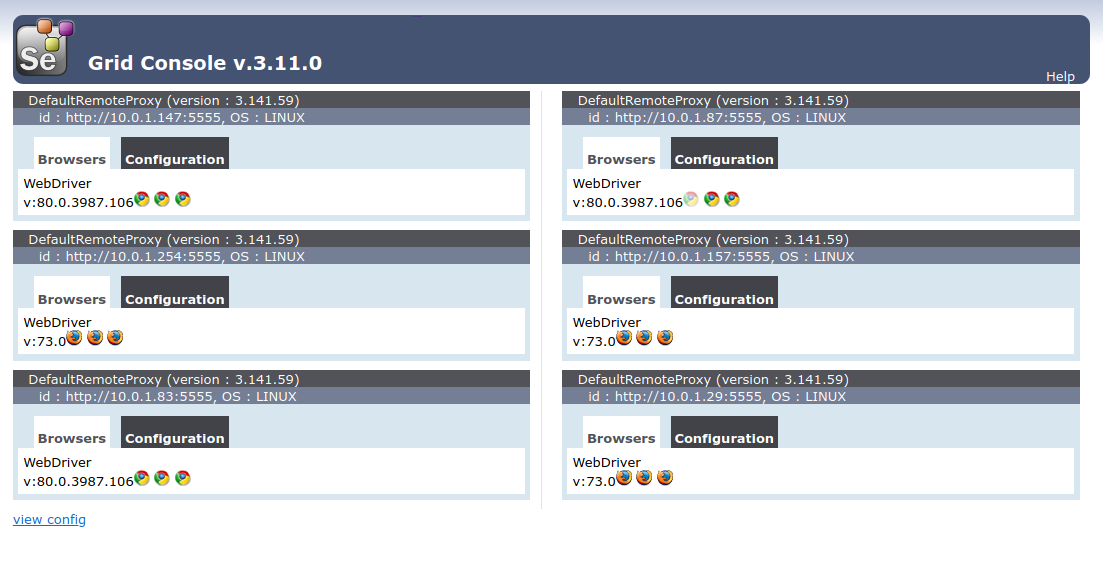
terraform applyConfirm, and wait for the hub_address output to appear, which will be the DNS of the ALB. Wait a few minutes more though (the hub container needs to run, register with the ALB target group), then browse to the address and the Selenium Hub page should appear. If you go to /grid/console then you can see the Selenium browser nodes appear as well.
Don’t leave
your_ip_addresses as 0.0.0.0/0, it’s only for testing purposes; change it to your own IP address to prevent others from running tests against your grid.
Run a test
Here’s a quick way to run a test with Smashtest.
Create a file, main.smash with this content. You can paste it a few times for more tests, but do preserve indentation:
Open Firefox
Open Chrome

    Navigate to 'code.mendhak.com'

        Navigate to 'https://code.mendhak.com/selenium-grid-ecs/'

            Navigate to 'https://code.mendhak.com/nextdns-with-nordvpn/'

                Go Back

                    Go Forward

                        Refresh
Then to run the test,
npm install smashtest
npx smashtest --test-server=http://your-load-balancer-12345.eu-west-1.elb.amazonaws.com/wd/hub --max-parallel=7
This will run the tests against your new Grid and if you refresh the Selenium Hub page you can see where the test is running, indicated by a dimmed browser icon.
Overview
There are quite a few AWS services that need to work together for this setup. The Docker images for Selenium Hub as well as the browsers are already provided by Selenium. This saves us the effort of having to build one. We just need to create task definitions for the hub and each browser, then run them as services in the ECS Cluster.
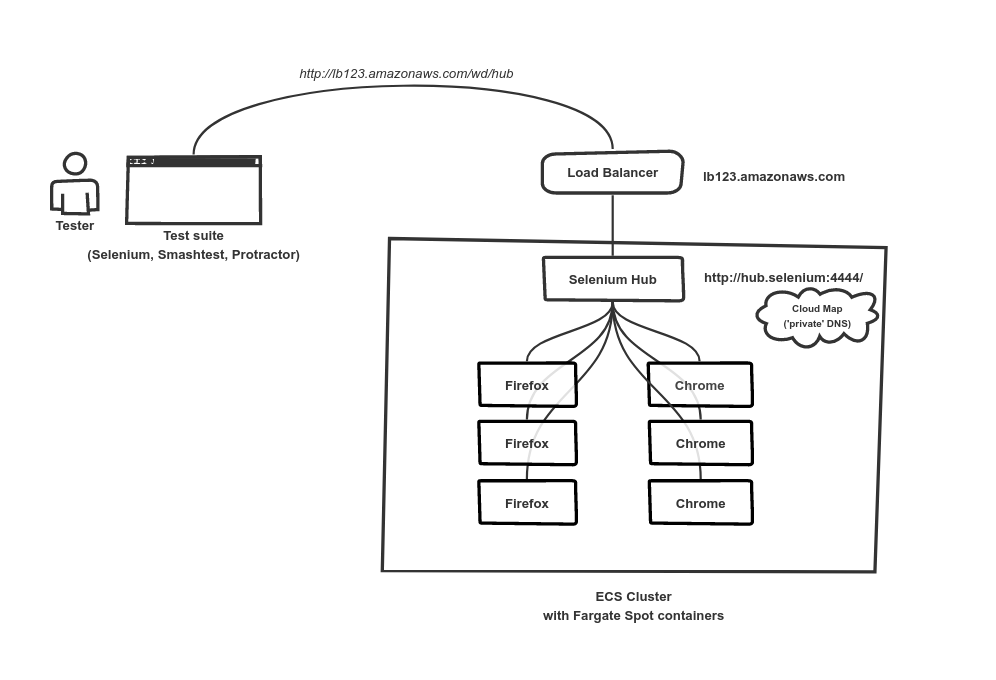
Each browser container will need to know where the hub is and register itself. To help them out, the hub will need to register itself with AWS Cloud Map, which is a service discovery tool. You can think of it as a ‘private’ DNS within your VPC.
The hub node will also need to register itself with a Load Balancer. This is because as the various containers in ECS are created and destroyed, they will have different private IP addresses. Having a constantly changing hub address can be disruptive for testers, so placing a load balancer in front of the hub helps keep the test configuration static enough; you could even point a domain name at the load balancer and use ACM to give it a secure, easy to remember URL.
The details
The security group
An aws_security_group is created
The IAM policy
Quite often, ECS needs to execute tasks on your behalf. This would be things like pulling ECR images, creating CloudWatch Log Groups, reading secrets from KMS. The ecs_execution_policy sets out what ECS is allowed to do, and is passed as an execution_role_arn when creating a task definition.
The Service Discovery and private DNS
In the service discovery section, we create a CloudMap Namespace with the TLD .selenium, and under that the service hub. This is passed in the service_registries when creating an ECS Service; the hub hub container registers here, creating the address http://hub.selenium so that the various browser containers can easily find the Selenium Hub container without knowing its IP address in advance.
## This makes it `.selenium`

resource "aws_service_discovery_private_dns_namespace" "selenium" {
  name        = "selenium"
  description = "private DNS for selenium"
  vpc         = var.vpc_id
}

## This makes it `hub.selenium`

resource "aws_service_discovery_service" "hub" {
  name = "hub"

  dns_config {
    namespace_id = aws_service_discovery_private_dns_namespace.selenium.id

    dns_records {
      ttl  = 60
      type = "A"
    }
  }

  health_check_custom_config {
    failure_threshold = 1
  }
}
The ECS Cluster
An ECS Cluster is just a logical grouping for ECS tasks, it doesn’t actually exist as a thing but is more of a designated area for the containers you want to run. Here we create the selenium grid cluster.
The most crucial money saving part here is specifying FARGATE_SPOT as the capacity provider.
resource "aws_ecs_cluster" "selenium_grid" {
  name = "selenium-grid"
  capacity_providers = ["FARGATE_SPOT"]
  default_capacity_provider_strategy {
      capacity_provider = "FARGATE_SPOT"
      weight = 1
  }

}
The hub task definition
ECS expects containers to be created based on task definitions. They are somewhat reminiscent of docker-compose files. Task definitions don’t actually run the containers, they just describe what you want when you do.
The Selenium Hub listens on port 4444, and we’ve chosen the selenium/hub:3.141.59 image from Docker Hub, and requested 1024 CPU units (1 vCPU) and 2 GB RAM.
resource "aws_ecs_task_definition" "seleniumhub" {
  family                = "seleniumhub"
  network_mode = "awsvpc"
  container_definitions = <<DEFINITION
[
   {
        "name": "hub",
        "image": "selenium/hub:3.141.59",
        "portMappings": [
            {
            "hostPort": 4444,
            "protocol": "tcp",
            "containerPort": 4444
            }
        ],
        "essential": true,
        "entryPoint": [],
        "command": []

    }
]
DEFINITION

requires_compatibilities = ["FARGATE"]
cpu = 1024
memory = 2048

}
The hub service
There’s a lot happening here as many things are brought together.
We can now run the ECS service by referencing the task_definition above.
The capacity_provider_strategy ensures it is placed on a Spot instance managed by Fargate.
The service_registries ensures it grabs the hub.selenium address.
The load_balancer ensure that it registers with the target group.
resource "aws_ecs_service" "seleniumhub" {
  name          = "seleniumhub"
  cluster       = aws_ecs_cluster.selenium_grid.id
  ...

  capacity_provider_strategy {
    capacity_provider = "FARGATE_SPOT"
    weight = 1
  }

  service_registries {
      registry_arn = aws_service_discovery_service.hub.arn
      container_name = "hub"
  }

  task_definition = aws_ecs_task_definition.seleniumhub.arn

  load_balancer {
    target_group_arn =   aws_lb_target_group.selenium-hub.arn
    container_name   = "hub"
    container_port   = 4444
  }

...
The Firefox and Chrome nodes
The task definitions for the browser nodes are also on Docker Hub. When the nodes are brought up they need to know the address of the Selenium Hub so that they can reach out and register themselves as part of the grid. This information can be provided as the HUB_HOST and HUB_PORT environment variables.
When registering, they need to inform the hub of their own address, but this isn’t so simple; since they are in containers, they will report an incorrect address to the Hub. AWS does provide a lookup address that containers can use to look the host IP address though, specifically http://169.254.170.2/v2/metadata, the task metadata endpoint and this includes, among other things, the host IP address.
We now need to modify the command of the nodes to include this as a step. Read the IP from the metadata endpoint, then export the REMOTE_HOST variable so that the node’s actual entrypoint script can pick it up.
We also specify a NODE_MAX_SESSION of 3 to indicate a maximum parallelization.
To help with troubleshooting, there’s also a logging configuration which uses the awslogs driver, which sends the container logs to Cloudwatch. Since this container will create its own log group, we ensured earlier that the execution_role_arn has permissions to create log groups.
resource "aws_ecs_task_definition" "firefox" {
  family                = "seleniumfirefox"
  network_mode = "awsvpc"
  container_definitions = <<DEFINITION
[
   {
            "name": "hub",
            "image": "selenium/node-firefox:latest",
            "portMappings": [
                {
                    "hostPort": 5555,
                    "protocol": "tcp",
                    "containerPort": 5555
                }
            ],
            "essential": true,
            "entryPoint": [],
            "command": [ "/bin/bash", "-c", "PRIVATE=$(curl -s http://169.254.170.2/v2/metadata | jq -r '.Containers[1].Networks[0].IPv4Addresses[0]') ; export REMOTE_HOST=\"http://$PRIVATE:5555\" ; /opt/bin/entry_point.sh" ],
            "environment": [
                {
                  "name": "HUB_HOST",
                  "value": "hub.selenium"
                },
                {
                  "name": "HUB_PORT",
                  "value": "4444"
                },
                {
                    "name":"NODE_MAX_SESSION",
                    "value":"3"
                },
                {
                    "name":"NODE_MAX_INSTANCES",
                    "value":"3"
                }
            ],
            "logConfiguration": {
                "logDriver": "awslogs",
                "options": {
                    "awslogs-create-group":"true",
                    "awslogs-group": "awslogs-selenium",
                    "awslogs-region": "eu-west-1",
                    "awslogs-stream-prefix": "firefox"
                }
            }
        }
]
DEFINITION

  requires_compatibilities = ["FARGATE"]
  cpu = 2048
  memory = 4096
  execution_role_arn = aws_iam_role.ecsTaskExecutionRole.arn

}
Finish
Once you’re done playing with the cluster or experimenting, be sure to tear the cluster down
terraform destroy