It was lovely while it lasted, but it is worth considering a move to Playwright instead. It will still remain one of my favourite testing frameworks due to its readability, ease of use, interactive mode, and that it was one of the first to make testing more accessible to non-developers.
Smashtest is a DSL on top of Selenium that makes reading and writing tests easy. It focuses on improving productivity with a lot of helpful features, it can run tests in parallel and also comes with an interactive mode.
Setup
For this tutorial, you will need to have NodeJS already installed.
Create a practice directory
Create a directory for this tutorial and cd into it.
mkdir smashtest-tutorial
cd smashtest-tutorial
Get the Gecko webdriver
Get the latest Firefox Gecko web driver. The web driver is needed by Smashtest (via Selenium) so that it can remotely control Firefox.
On Ubuntu:
wget -c https://github.com/mozilla/geckodriver/releases/download/v0.29.1/geckodriver-v0.29.1-linux64.tar.gz -O - | tar -xz
On Windows (Powershell):
wget https://github.com/mozilla/geckodriver/releases/download/v0.29.1/geckodriver-v0.29.1-win64.zip -o geckodriver.zip
Expand-Archive geckodriver.zip -DestinationPath .
rm geckodriver.zip
Install Smashtest
The Smashtest package is available via npm.
npm install smashtest
Write your first test
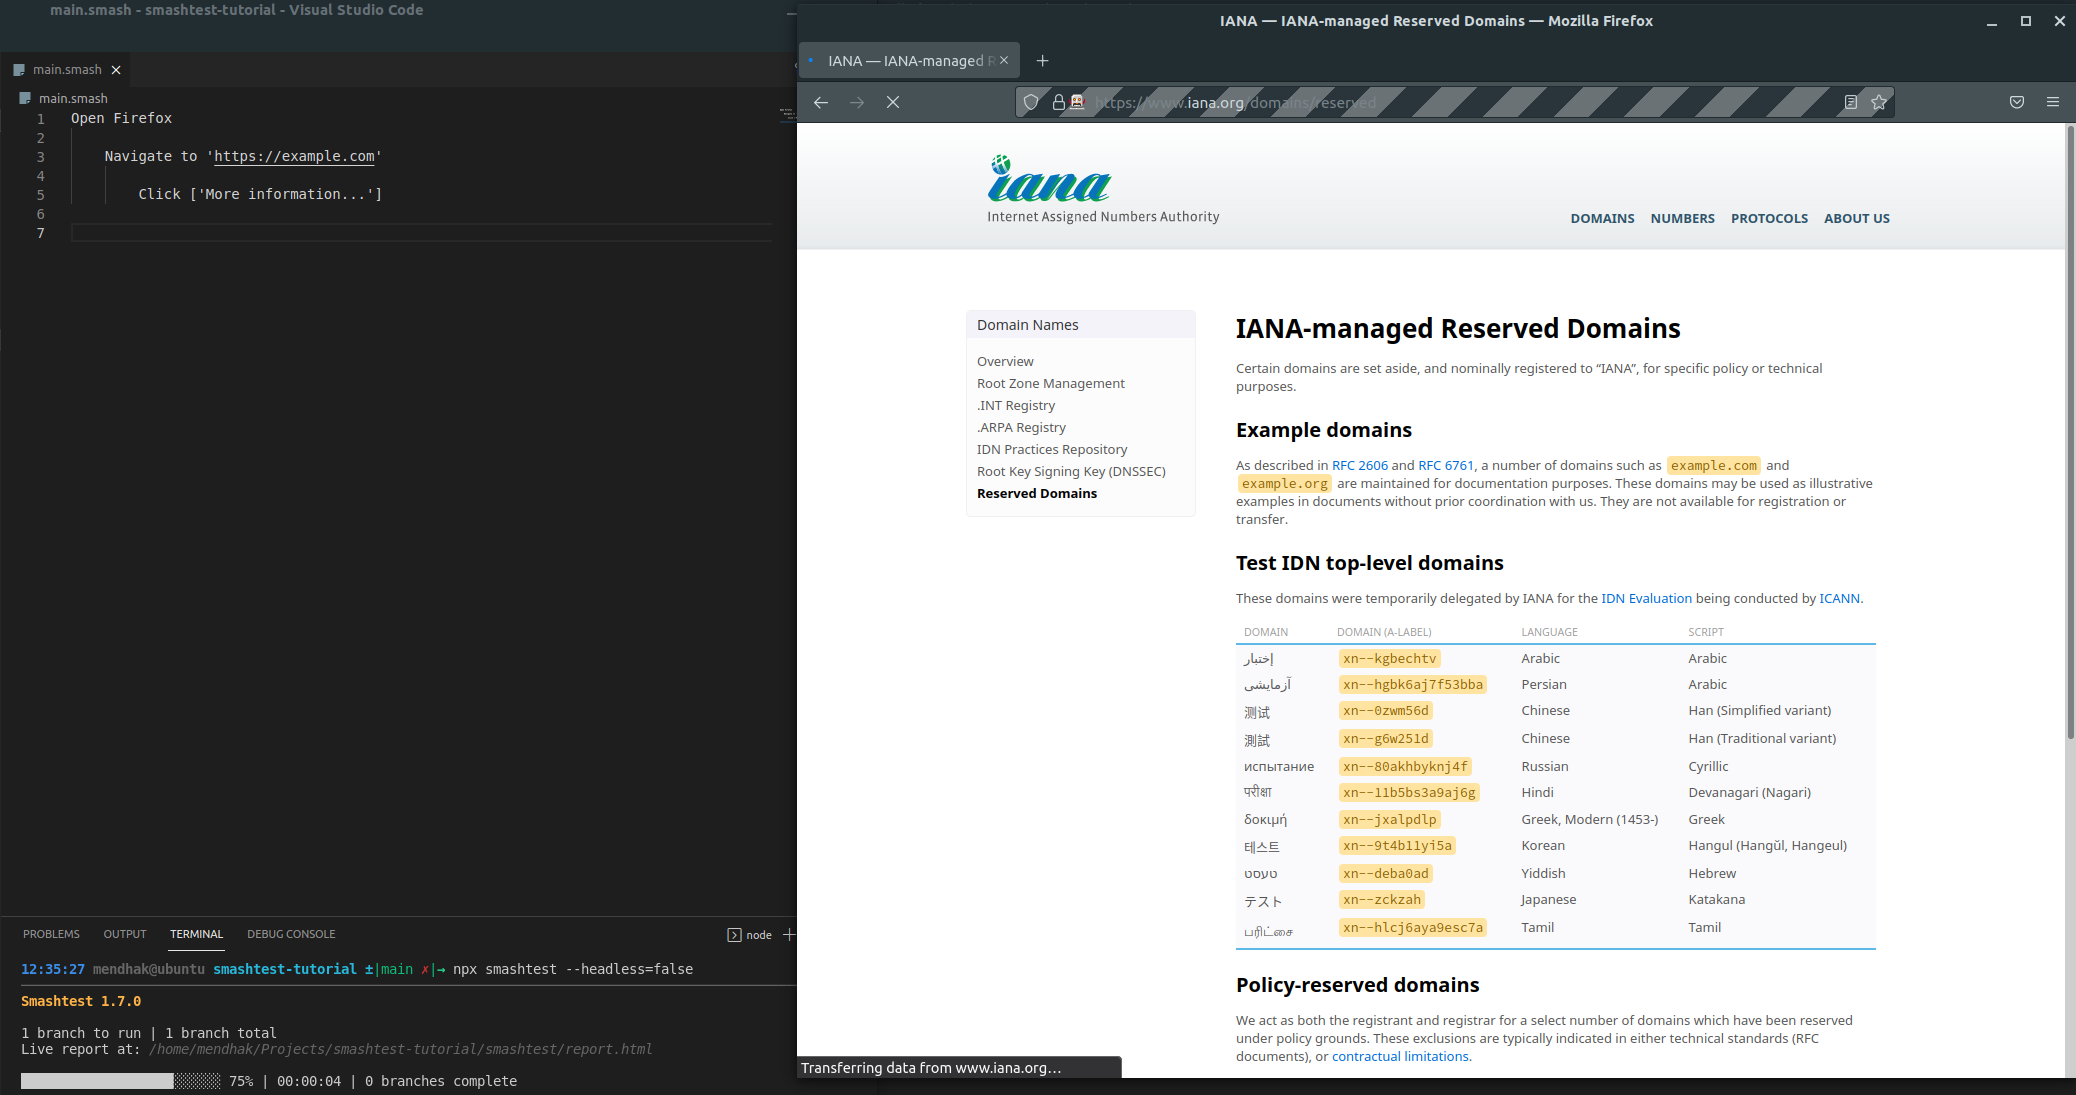
Create a main.smash file. Add these contents
Open Firefox

    Navigate to 'https://example.com'

        Click ['More information...']
Now run the test visually:
npx smashtest --headless=false
A browser window is launched, navigates to example.com and clicks “More Information”. The --headless=false lets you see what is happening.
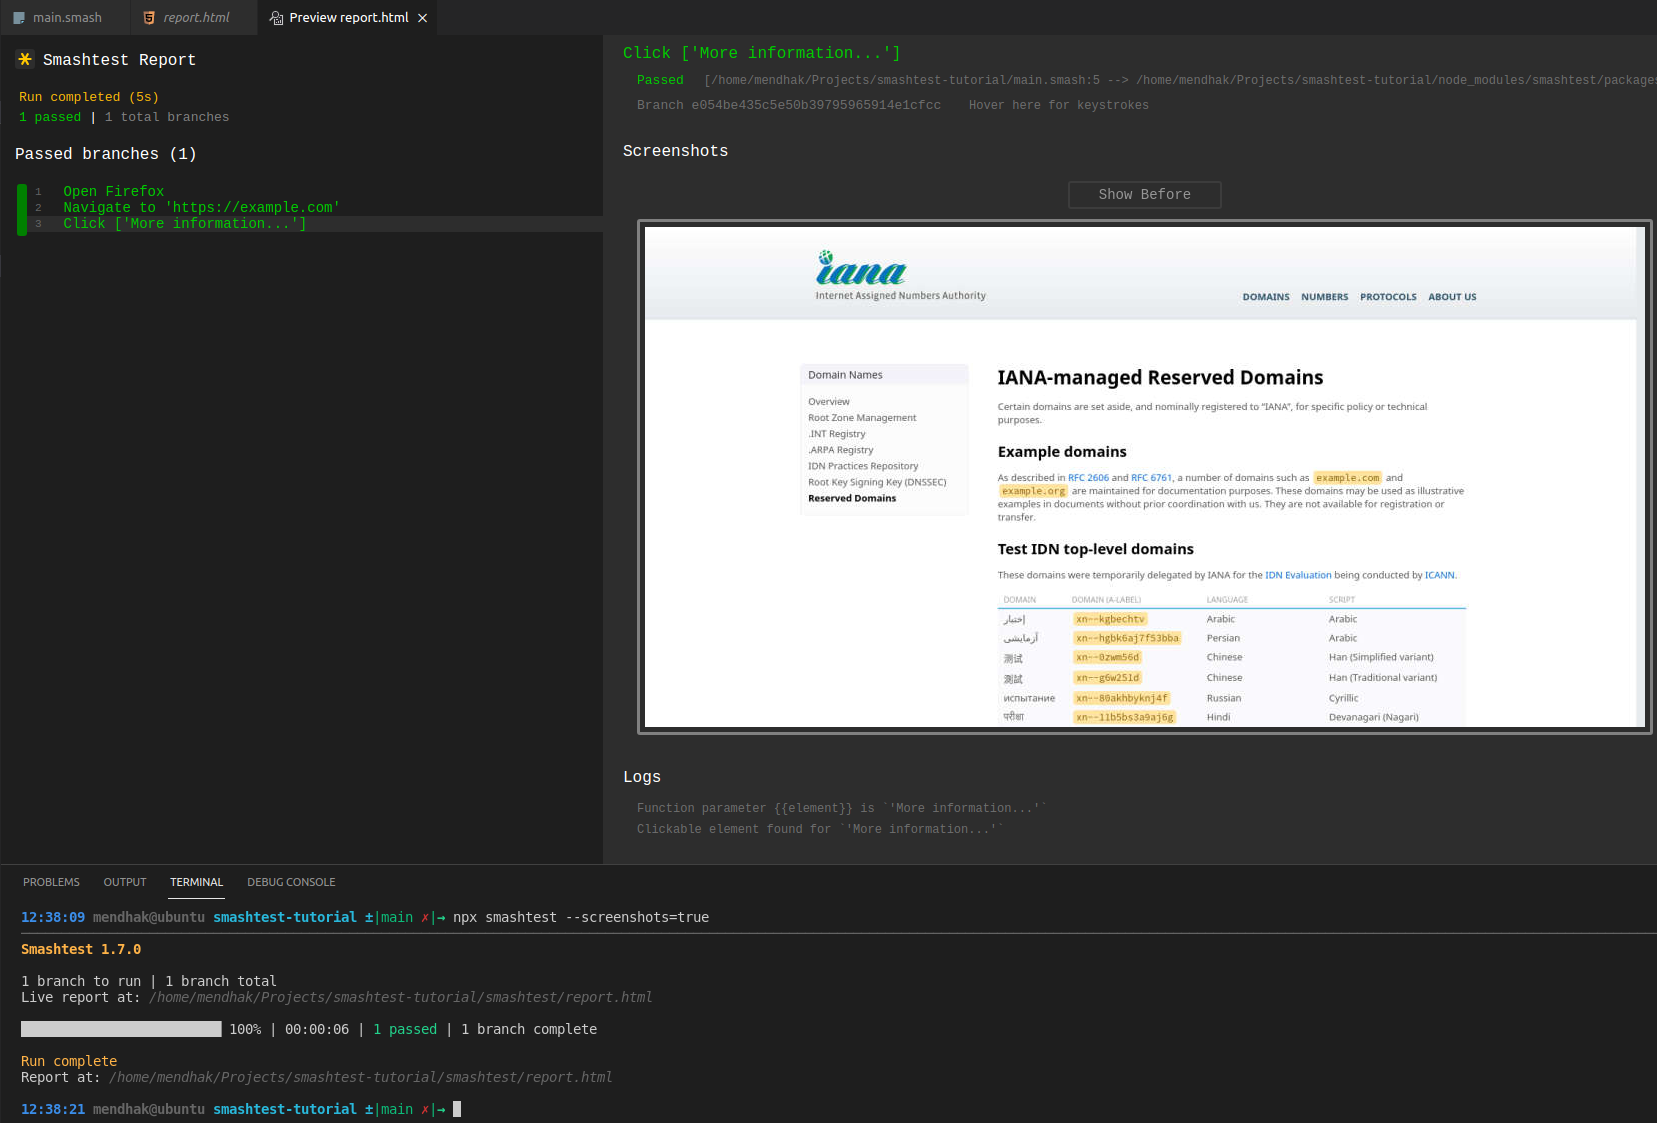
You can also run the test headless by default, but view it as a series of screenshots instead.
npx smashtest --screenshots=true
When the test completes, preview the smashtest/report.html file, which shows the output with screenshots.
Write a test interactively
Writing tests interactively is useful for slightly complicated examples. A good example is Google search - when visiting google.com for the first time, a cookie dialog appears. The dialog needs to be dismissed before performing a search.
Start by replacing the main.smash file, and putting these lines in:
Open Firefox

    ~ Navigate to 'https://www.google.com'
Run npx smashtest. This time, due to the debug modifier ~, a browser window is launched, and the terminal goes into interactive mode. The tests pause just before the Navigate step.
In the terminal you can now type Smashtest commands and watch what it does interactively.
Press enter in the terminal to proceed with the Navigate step.
Enter this, which will click the ‘I agree’ button on the cookie dialog:
Click ['I agree']
The dialog disappears.
You can then perform a search:
Type 'hello world[enter]' into 'input'
That takes you to a search results page.
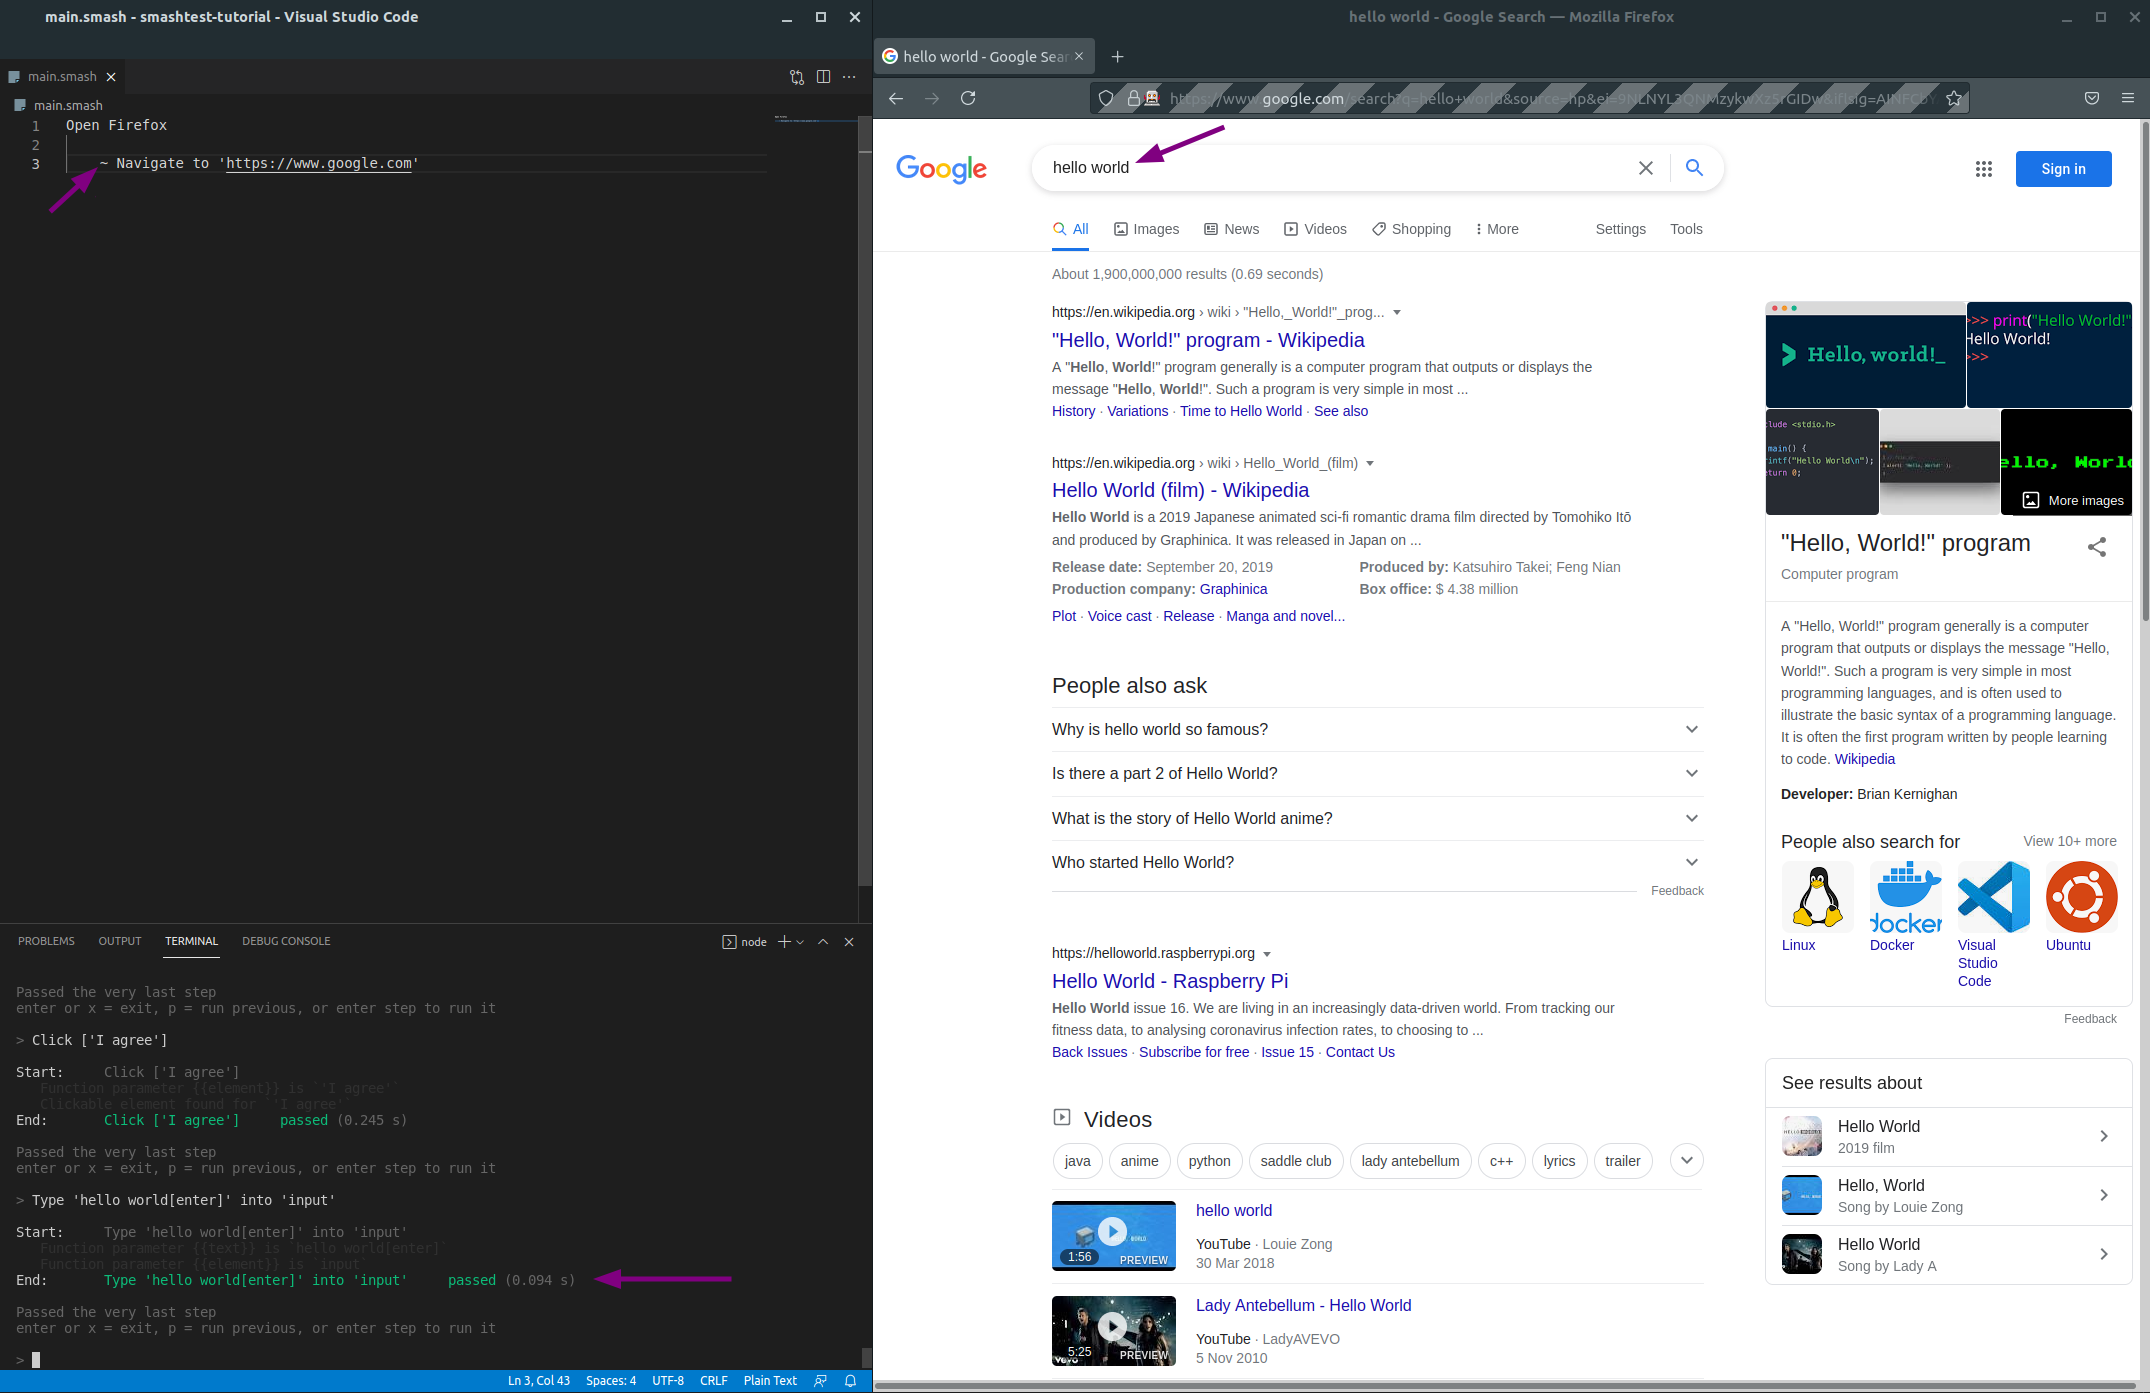
Finally use x to exit the REPL.
Put what you’ve learned so far into the main.smash
Open Firefox

    Navigate to 'https://www.google.com'

        Click ['I agree']

            Type 'hello world[enter]' into 'input'
Rerun the test using npx smashtest --headless=false to see the steps in action.
Run tests in branches
Write a test which goes to Google’s page, but performs two different searches. The new search step should be at the same indent level as the original.
The main.smash now looks like:
Open Firefox

    Navigate to 'https://www.google.com'

        Click ['I agree']

            Type 'hello world[enter]' into 'input'

            Type 'hello universe[enter]' into 'input'
Run the test with npx smashtest --headless=false and notice that two browser windows open.
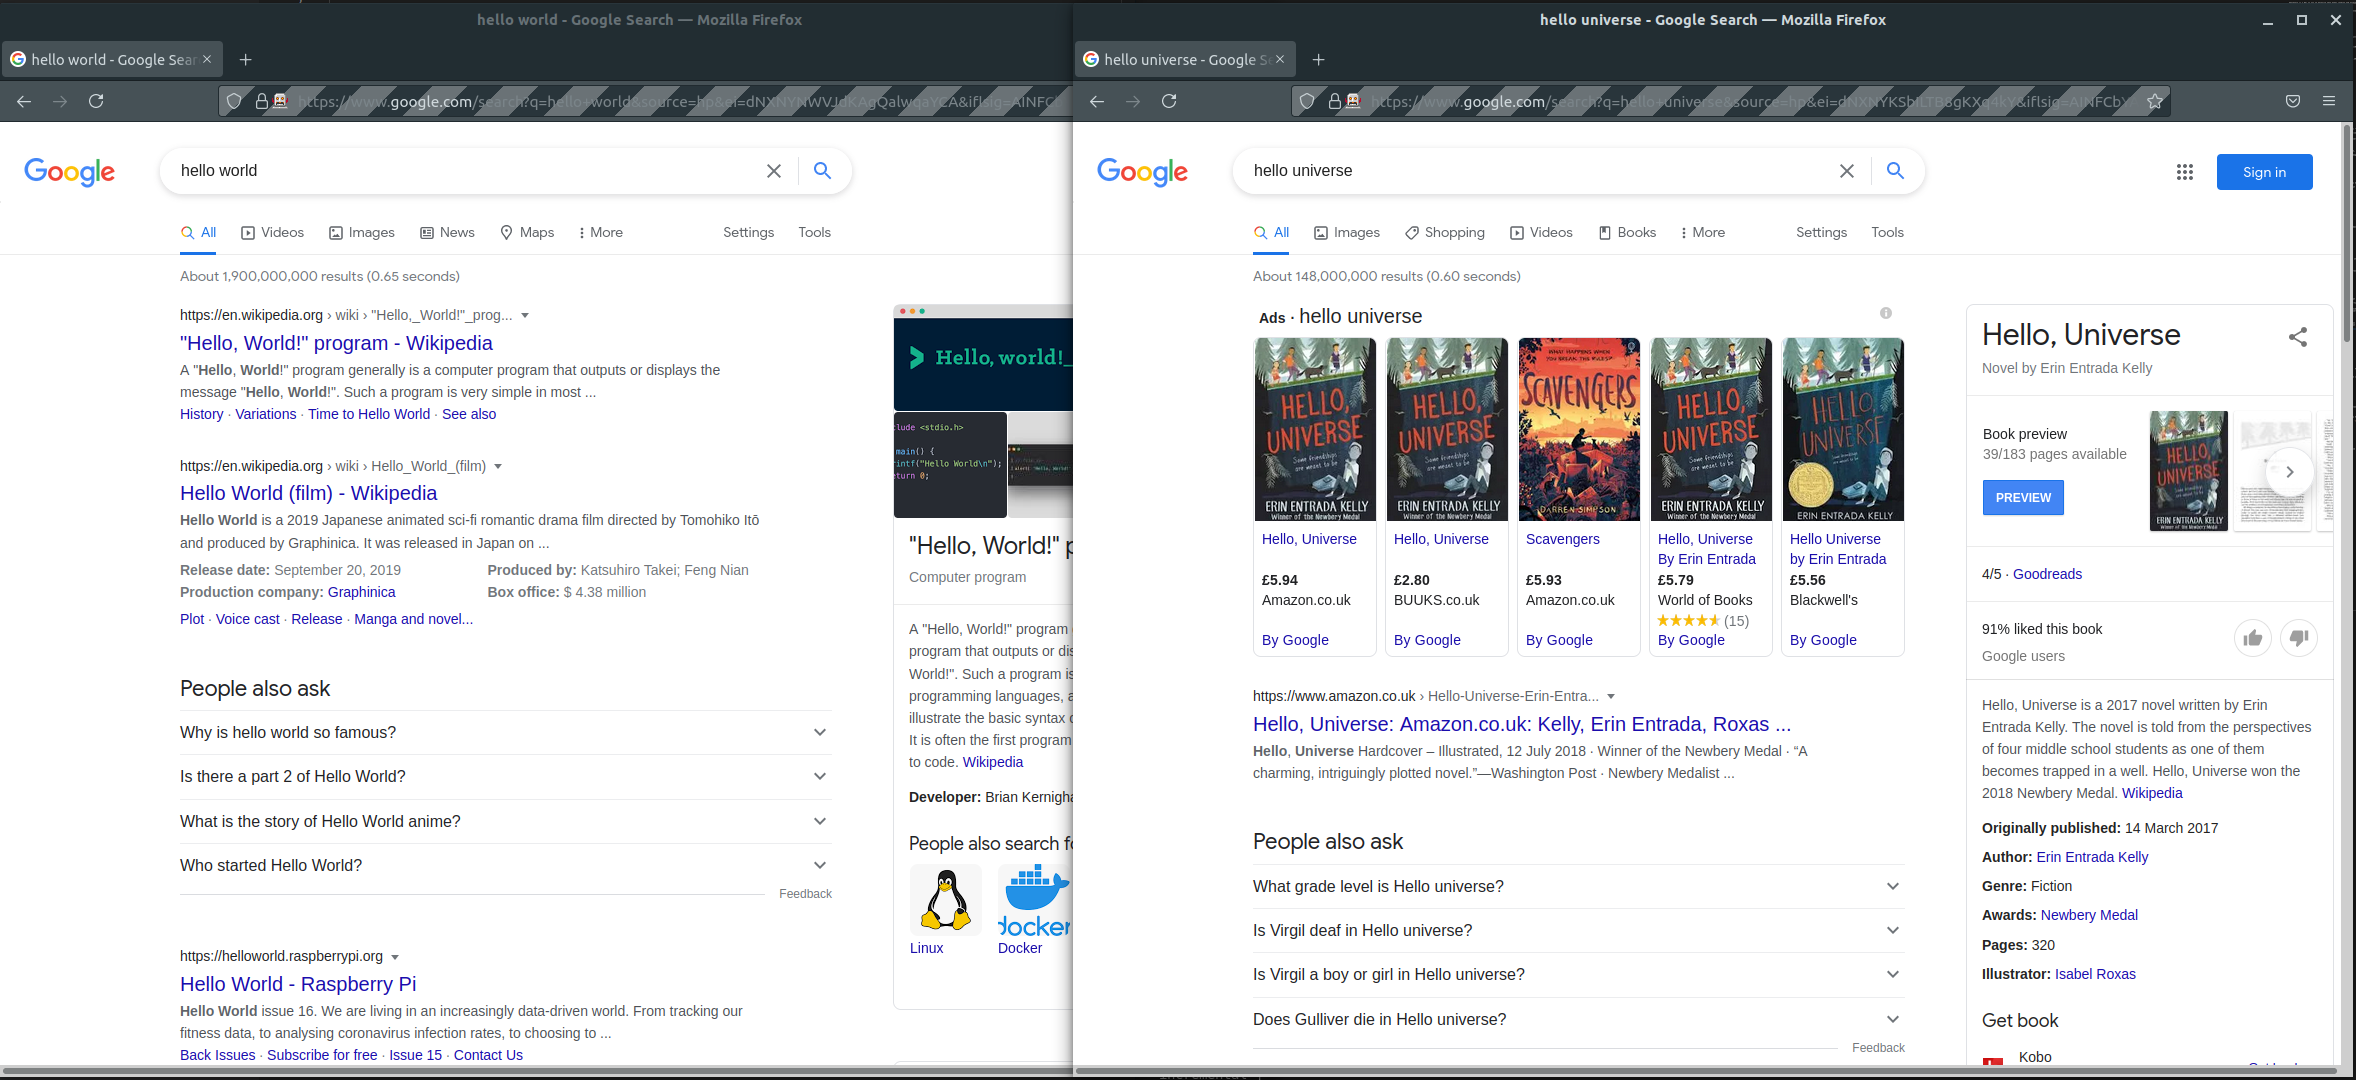
Indented instructions happen one after the other, in one branch.
Instructions at the same level, next to each other, create branches which run separately.
The above example results in two branches and therefore two browsers.
Verify elements on the page
As part of testing, it’s sometimes important to verify that elements are visible on the page.
On the ‘hello world’ search results page, one of the top links was to Wikipedia.
On the ‘hello universe’ page, there was a side bar referring to an author.
The Verify steps below show how to verify that the link and text are visible.
The main.smash becomes:
Open Firefox

    Navigate to 'https://www.google.com'

        Click ['I agree']

            Type 'hello world[enter]' into 'input'

                Verify [a, 'Wikipedia'] is visible

            Type 'hello universe[enter]' into 'input'

                Verify ['Erin Entrada Kelly'] is visible
Run the test to ensure it’s still working, npx smashtest.
The first verify looks for a link with the word Wikipedia in it. The second looks for any element with the author’s name in it.
Verify URLs
It’s also possible to verify URLs and page titles. Create a new smash file called links.smash. This time, go to the Google home page but click the ‘About’ link, and verify the URL.
Open Firefox

    Navigate to 'https://www.google.com'

        Click ['I agree']

            Click ['About']

                Verify at page 'https://about.google/'
Run the test to ensure it’s still working, npx smashtest. As long as part of the URL matches, it will pass. It’s also possible to use regex here.
links.smash. By default, smashtest will look for all .smash files in the current directory.
It’s possible to test just one file by passing the filename, npx smashtest main.smashCreate functions
Although main.smash and links.smash are different tests, they have the same initial steps: go to the home page and dismiss a dialog. Repeated steps can be turned into functions.
Create a go-to-homepage.smash, and create a function using the * functionname syntax:
* Go to the startpage

    Open Firefox

        Navigate to 'https://www.google.com'

            Click ['I agree']
Now change the first part of links.smash and main.smash to use that function just created.
Go to the startpage

    Type 'hello world[enter]' into 'input'

    Type 'hello universe[enter]' into 'input'
Go to the startpage

    Click ['About']

        Verify at page 'https://about.google/'
Run npx smashtest to ensure the tests are still passing.
Run a single branch
Each time you run Smashtest it will run all available branches. You can use the $ modifier to tell Smashtest to isolate itself to that area.
As an example:
Go to the startpage

    $ Type 'hello world[enter]' into 'input'

    Type 'hello universe[enter]' into 'input'
When you run npx smashtest only a single branch, the hello world search, will run. Remove the $ before moving on to the next steps.
Create a smashtest.json
Instead of passing arguments to Smashtest, the flags can go into a smashtest.json file. Smashtest will read those values on each run.
Create a smashtest.json with:
{
    "headless": false,
    "screenshots": true
}
If you now run npx smashtest, the browser should open, and the Smashtest report should contain screenshots.
A more involved test on MDN
The most important skill to learn when writing Smashtests is telling it how to find the element you’re interested in.
Some elements will be easy to find, they’ll have a unique id.
Some elements will be nested deep inside layers of divs or in very dynamic SPAs.
In this next test, you’ll go to Mozilla’s MDN web docs, search for the array object, click the first result, and then change the page’s language to Deutsch. This should cover a few different ways of finding elements.
The screenshots should still illustrate the concepts of finding elements.
Perform a search
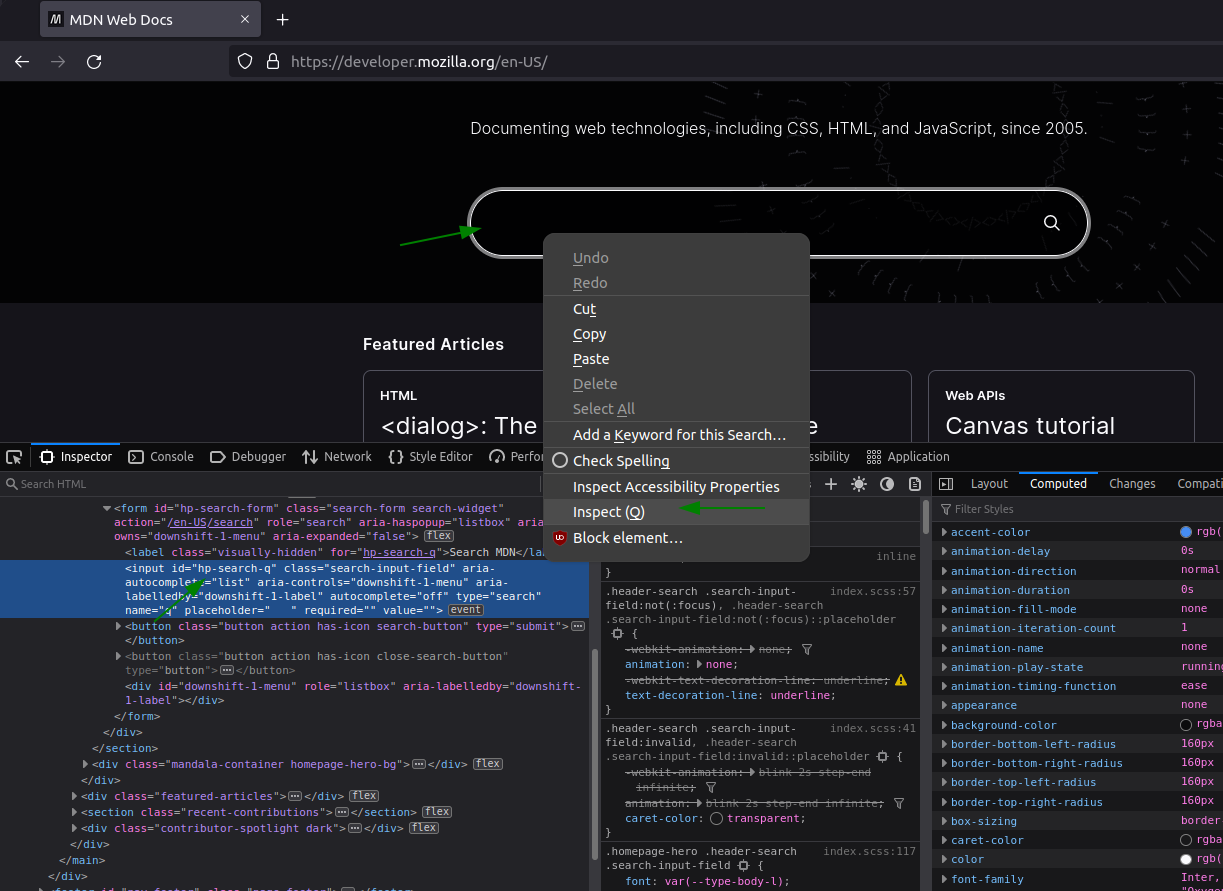
To begin, open up https://developer.mozilla.org in your own browser. Right click the main search textbox and inspect element.
Right away, the id of that input field is an obvious candidate to use.
In a new file, mdn.smash, add these lines. Use the $ as this is a new test and you don’t want to wait around for other tests to delay you:
Open Firefox

    Navigate to 'https://developer.mozilla.org/'

        $ Type 'array' into '#hp-search-q'

            Wait '5' secs
This should open MDN, type ‘array’ and a dropdown of search results should appear.
Click the first search result
The next objective is to click the first link in the search results dropdown.
In your mdn.smash:
Open Firefox

    Navigate to 'https://developer.mozilla.org/'

        ~ Type 'array' into '#hp-search-q'
Use the ~ modifier to go into interactive mode. Press enter in the console so that Smashtest proceeds to the next step, and the search results dropdown appears.
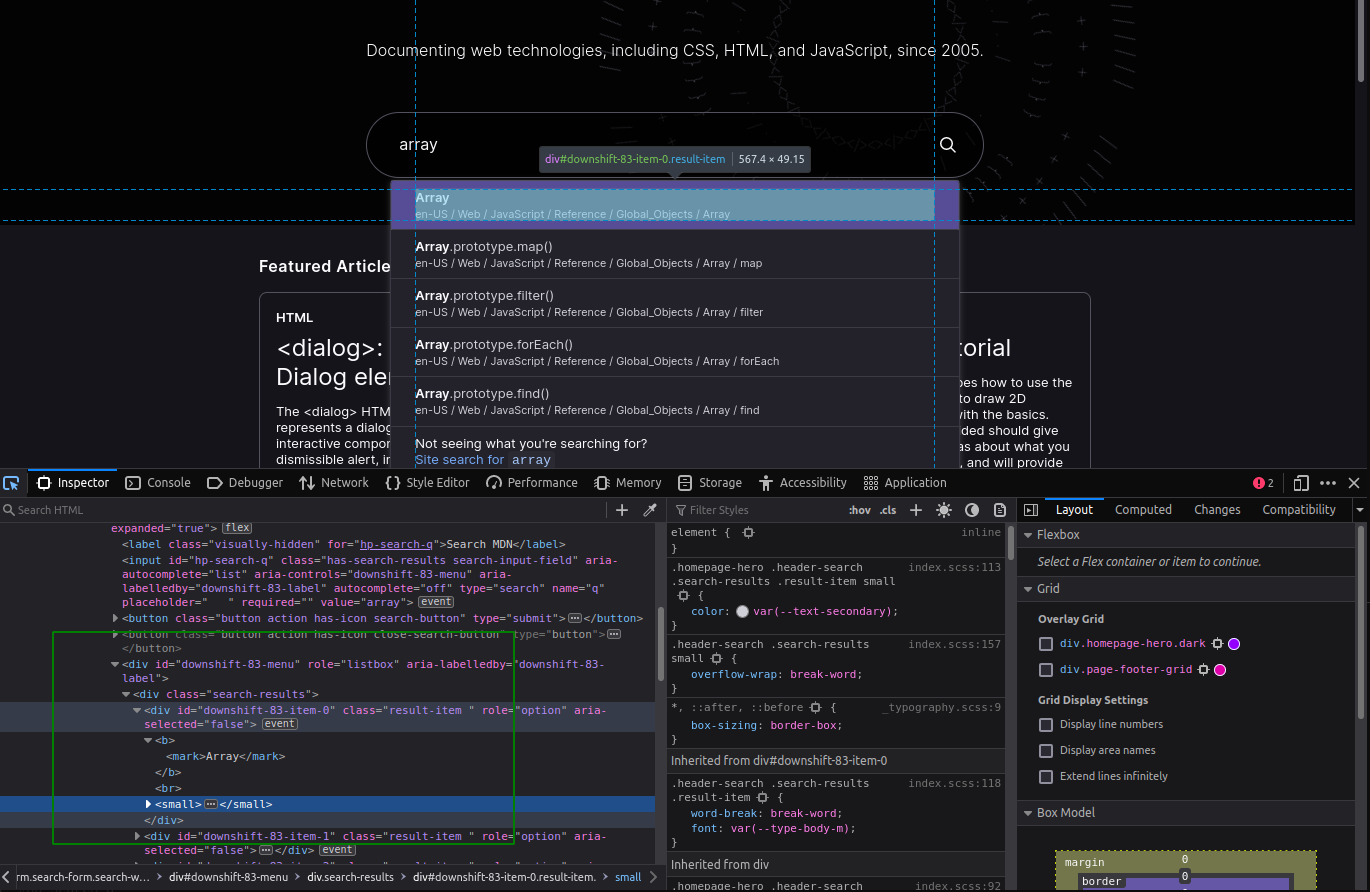
Right click and inspect the first search result, as expected there isn’t anything unique that marks it from the others.
Picking useful selectors
Notice that all the results are under a div with class=search-results. And each item has a class=result-item
That means a possible selector is div.search-results .result-item.
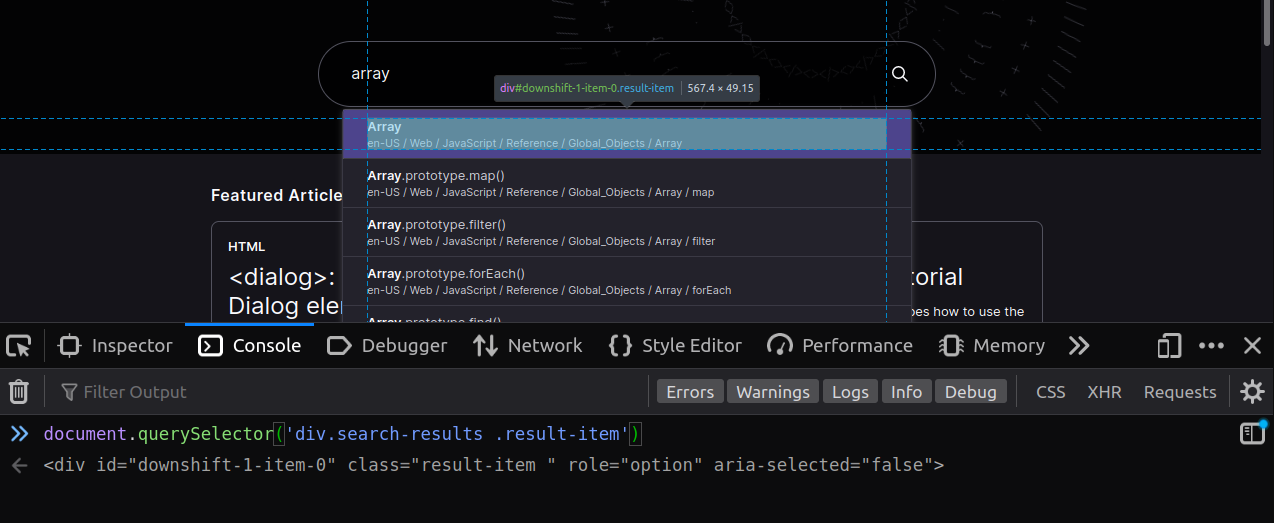
Although this will match every search result link, by default Smashtest will match against the first one. To see for yourself, switch to the Console of developer tools, and type this
document.querySelector('div.search-results .result-item')
The first search result gets highlighted. That’s pretty much the same behavior as Smashtest’s.
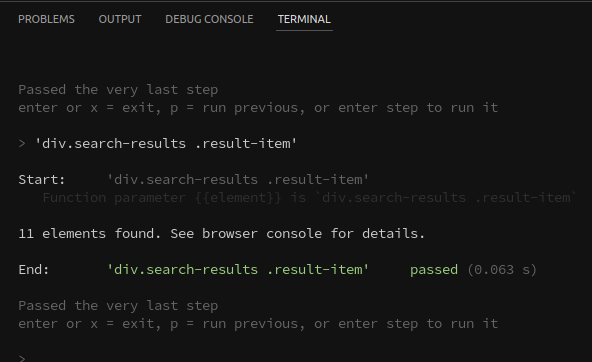
Now that you’ve found a good selector to use, try it in the terminal. Entering just a selector will let you know if Smashtest was able to find it.
'div.search-results .result-item'
Found it:
Both document.querySelector and typing selectors into interactive mode are useful ways of finding what you need on the page.
Now that you know Smashtest can work with it, get Smashtest to click it.
Click 'div.search-results .result-item'
That should take you to the Array documentation page. Enter x to exit, and add it to your mdn.smash:
Open Firefox

    Navigate to 'https://developer.mozilla.org/'

        Type 'array' into '#hp-search-q'

            $ Click 'div.search-results .result-item'
Give selectors a friendly, readable name
The selector 'div.search-results .result-item' is not very readable, and neither is '#hp-search-q'. Smashtest has a feature called props which lets you map readable names to CSS selectors.
Props are just another step in the test branch, and are just ‘lookups’, so they can go anywhere in the steps. The mdn.smash can be rewritten like this, try running it:
Open Firefox

    Navigate to 'https://developer.mozilla.org/'

        On MDN {
            props({
                'Search box': `#hp-search-q`,
                'Search Result Link': `div.search-results .result-item`
            })
        }

            Type 'array' into 'Search box'

                $ Click '1st Search Result Link'
Notice a few things. The human friendly, readable string Search Result Link has been mapped the CSS selector, it can easily be changed in the future while staying readable.
The 1st is just being explicit about which link to click. It can be changed to 2nd, 3rd etc for larger testing. You can only apply ordinals (1st, 2nd, 3rd…) to selectors that match multiple values.
Also, when changing a CSS selector in a step, to a prop, notice how the single quotes ' become graves or backticks `.
Change the language to Deutsch
Once again, use interactive mode, with your mdn.smash so far:
Open Firefox

    Navigate to 'https://developer.mozilla.org/'

        On MDN {
            props({
                'Search box': `#hp-search-q`,
                'Search Result Link': `div.search-results .result-item`
            })
        }

            Type 'array' into 'Search box'

                ~ Click '1st Search Result Link'
Run it with npx smashtest and press Enter in the console to get to the documentation page. Right click the ‘English’ menu in the top right, and inspect element.

It’s a simple span with the word English in it. In the terminal, try:
[span, 'English']
And that should work, it basically means, look for any span element on the page, with the inner text ‘Change language’, even if that inner text is nested.
But if you try it without any element, that will work too:
['English']
This syntax means, look for any element on the page, with the inner text ‘Change language’. In other words, it’s a useful shortcut for strings that you know are unique on a page.
Proceed by clicking it.
Click ['English']
A dropdown with a list of languages appears. Inspecting the dropdown reveals that it has a unique class, .language-menu and contains a list of li and button with the languages to choose from.
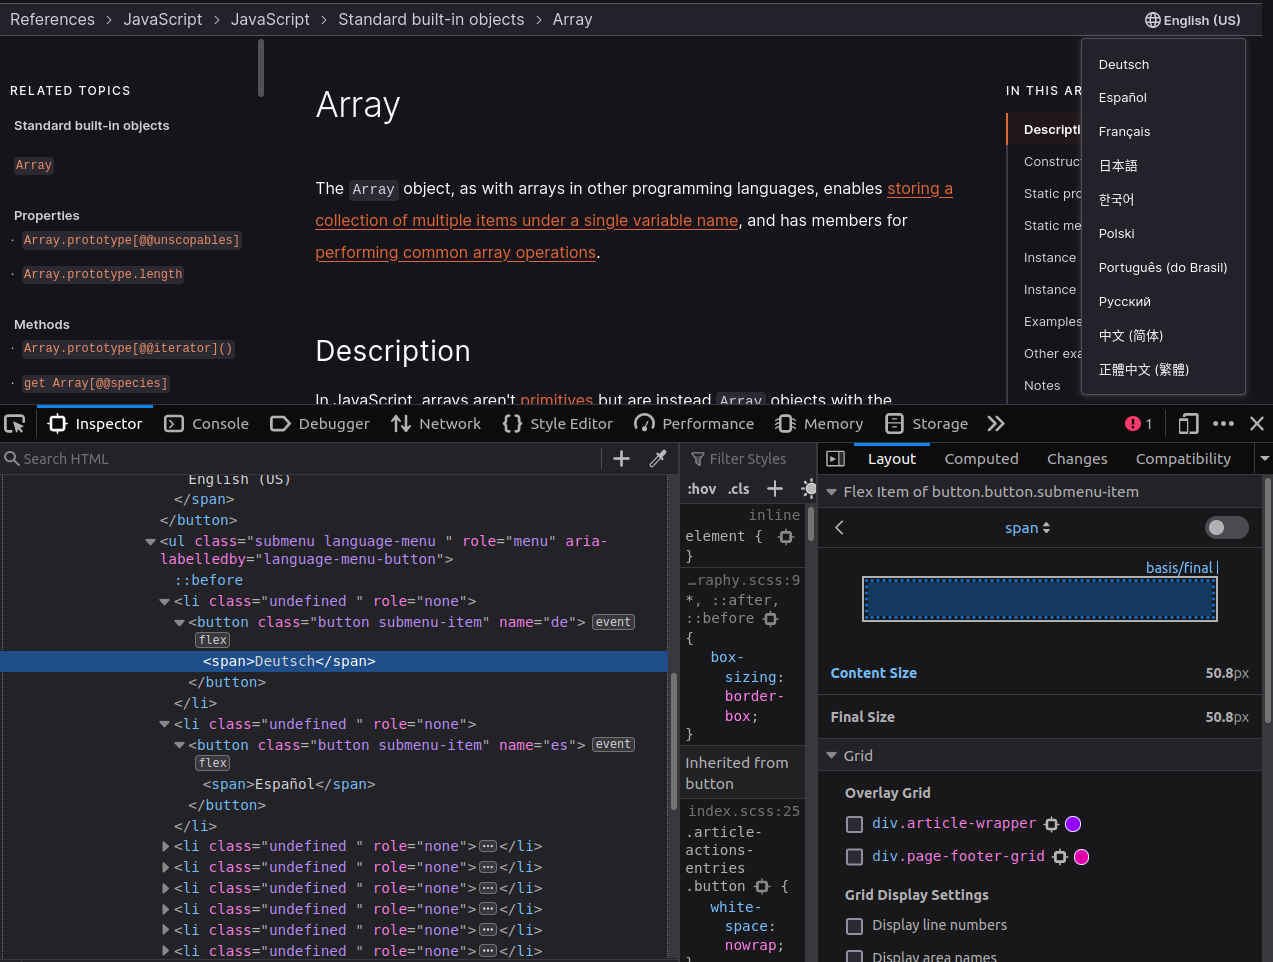
In terminal, try:
'.language-menu li'
This is going to match multiple values, and could probably work, but the requirement is to be more specific. Let’s try the button directly, which contains a name attribute.
Click '.language-menu button[name="de"]'
That should be enough to update our mdn.smash. Also from previous experience, the selector for Deutsch doesn’t look very readable, so give it a prop.
Open Firefox

    Navigate to 'https://developer.mozilla.org/'

        On MDN {
            props({
                'Search box': `#hp-search-q`,
                'Search Result Link': `div.search-results .result-item`,
                'German language option': `.language-menu button[name="de"]`
            })
        }

            Type 'array' into 'Search box'

                Click '1st Search Result Link'

                    Click ['English']

                        $ Click 'German language option'
Taking it even further, those finders in square brackets can also be converted to props. Square brackets become backticks.
Open Firefox

    Navigate to 'https://developer.mozilla.org/'

        On MDN {
            props({
                'Search box': `#hp-search-q`,
                'Search Result Link': `div.search-results .result-item`,
                'German language option': `.language-menu button[name="de"]`,
                'Change language button': `'English'`
            })
        }

            Type 'array' into 'Search box'

                Click '1st Search Result Link'

                    Click 'Change language button'

                        $ Click 'German language option'
Other topics
This tutorial has covered the basics of Smashtest. There are several other useful features not covered, but which are pretty handy as you write more and more tests.
When writing functions, it’s possible to write functions with JavaScript, see the code reference.
The Groups feature lets you target devices, browsers, and your own custom tags.
Element finders are briefly covered above with selectors, and this page covers the many different ways you can match and find things on a page.
The Variables feature lets you define values externally or from smashtest.json, and use them in the steps.
Smashtest can also be used for API testing.
Smashtests and Docker
It’s a good idea to run Smashtests as part of CI/CD, either after a deployment or as an after-hours run.
Smashtest can run against a Selenium Grid inside Docker. You can set up a Docker Compose file that has a Selenium Grid in it.
services:
    hub:
        image: selenium/hub:latest
        ports:
          - 4444:4444
    chrome:
        image: selenium/node-chrome-debug:latest
        environment:
          - HUB_PORT_4444_TCP_ADDR=hub
          - HUB_PORT_4444_TCP_PORT=4444
        depends_on:
          - hub
    firefox:
        image: selenium/node-firefox-debug:latest
        environment:
          - HUB_PORT_4444_TCP_ADDR=hub
          - HUB_PORT_4444_TCP_PORT=4444
        depends_on:
          - hub
Bring it up with docker-compose up -d, then point Smashtest at this local grid using the test-server argument:
npx smashtest --test-server=http://localhost:4444/wd/hub
Any tests you run this way will be headless, so you should enable screenshots to see what’s going on.
You can also set up your own Selenium Grid using ECS Fargate.