I have previously shown how to serve keys to WSL1, here I’ll be going over the method to do it for WSL2.
KeepassXC can be used to serve SSH keys to WSL2, which is useful when remoting on to servers, or using Git over SSH. Some benefits of putting your SSH key into your KeepassXC are that you can have a strong password on the private key but don’t need to type it out each time, and that you don’t need to save your keys on disk - you can let KeePassXC manage the storage, unlocking and serving of the keys for you.
Set up KeePassXC
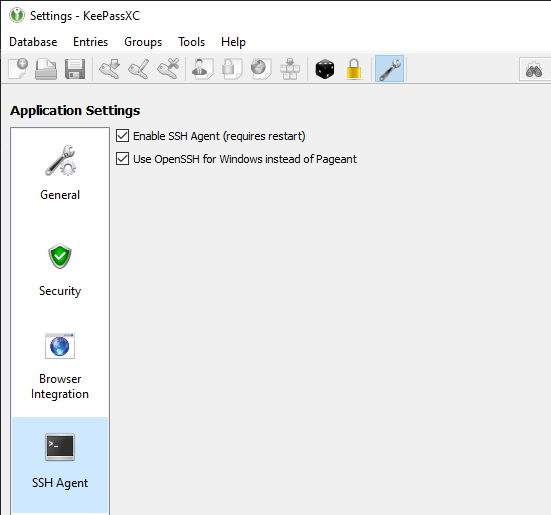
Open up KeePassXC’s settings, and choose to Enable SSH Agent and also Use OpenSSH for Windows instead of Pageant.
The second option requires the OpenSSH service in Windows to already be running, you will get an error message if it isn’t.
Store an SSH key
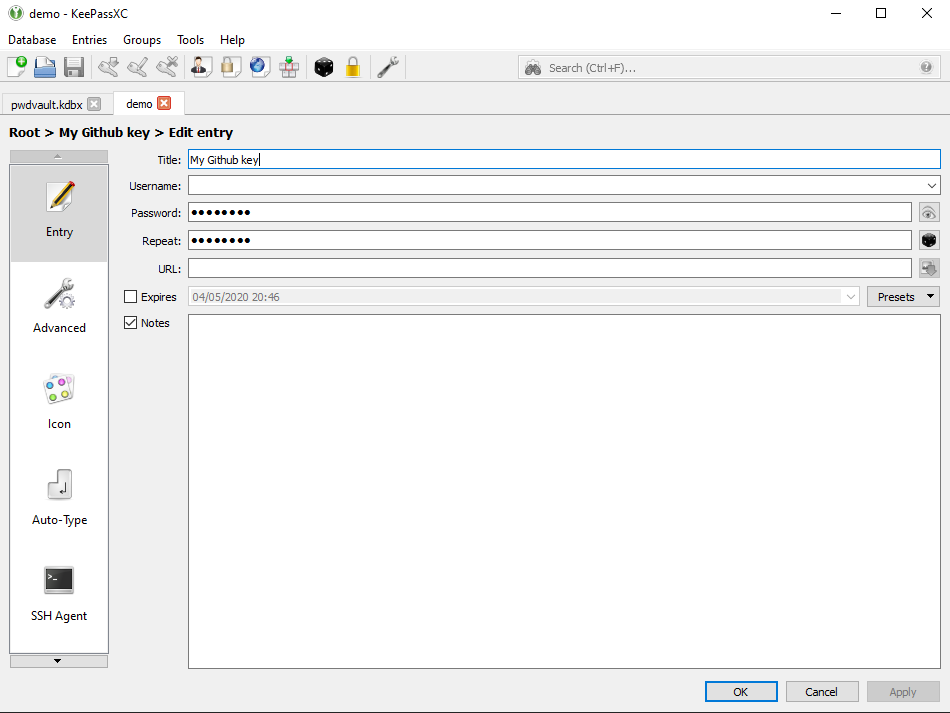
Create a new entry in your database, give it some name, and in the password field, put the passphrase for your SSH key.
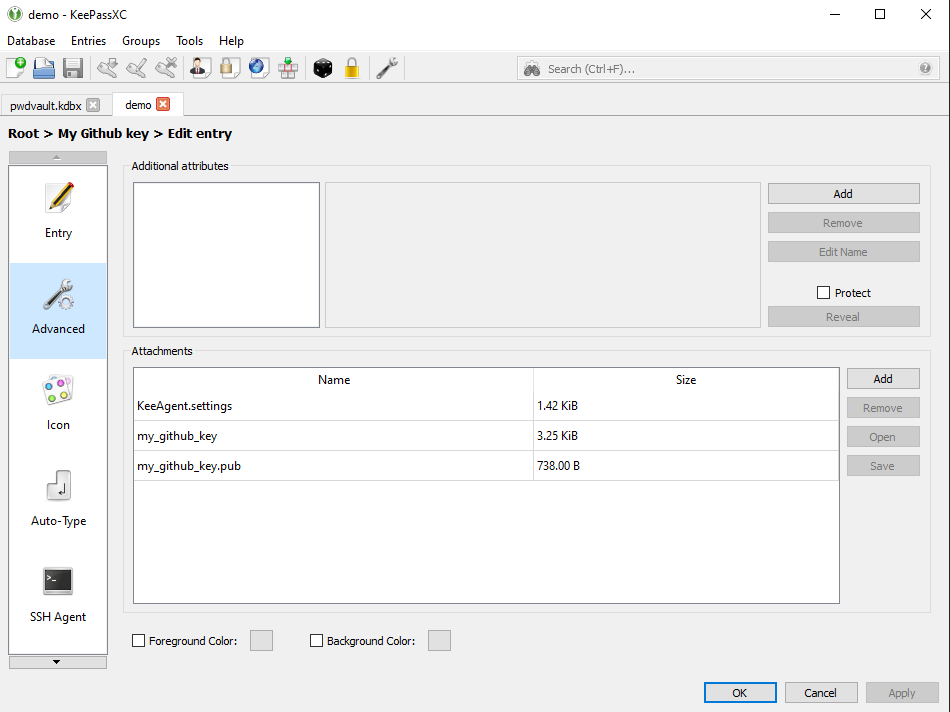
In the advanced section, attach your public and private key, then hit OK, then save the entry. You need to save so that the SSH Agent can read your key in the next step.
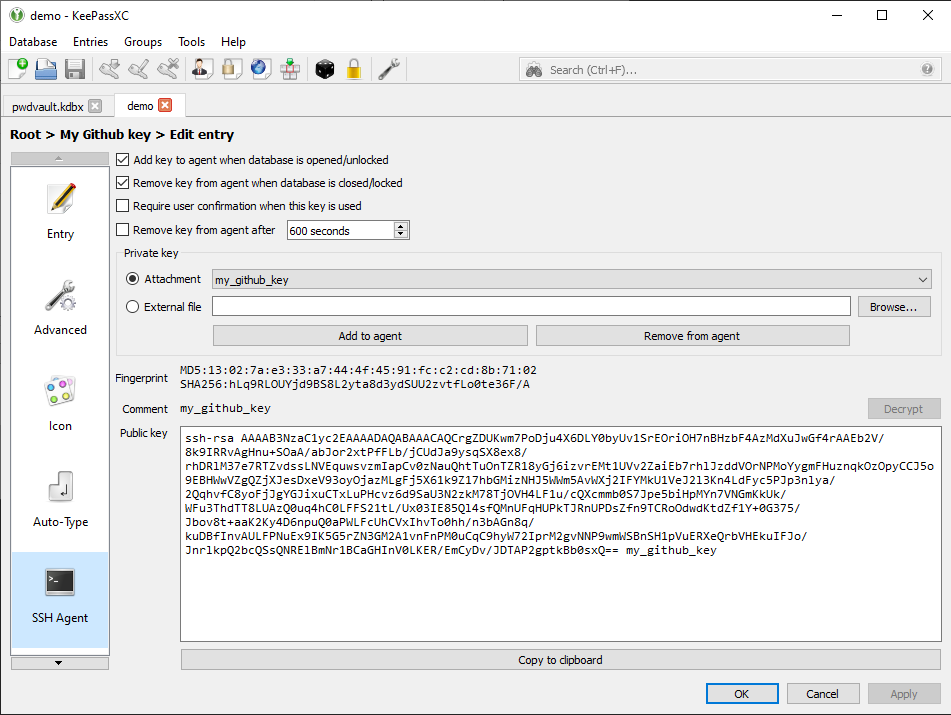
Now reopen the entry, then go to the SSH Agent section, under Private key, pick the file you attached earlier. The rest of the section should get filled out with details about your key. Once again hit OK and save; KeePassXC is now serving those keys to the Windows SSH agent.
Get Npiperelay
npiperelay allows named pipes to communicate between Linux in WSL and Windows. It is a Windows based tool and needs to be run from the Windows side.
You can do this from WSL2, download and extract the npiperelay binary to a Windows directory of your choice.
npiperelaypath=$(wslpath "C:/npiperelay")
cd ~
wget https://github.com/jstarks/npiperelay/releases/latest/download/npiperelay_windows_amd64.zip
unzip npiperelay_windows_amd64.zip -d $npiperelaypath
rm npiperelay_windows_amd64.zip
This puts the npiperelay.exe at C:\npiperelay\, so adjust the path to your liking.
/c/Temp/npiperelay.exe
Install socat
In your WSL2, install socat, to allow communication with npiperelay.
sudo apt install socatTell WSL to use it
You will need to tell WSL2 to talk to npiperelay via socat, so that it can talk to Windows SSH Agent, so that it can fetch your keys from KeePassXC.
In your ~/.bashrc, add the following lines. This code checks to see if the agent socket is up,
export SSH_AUTH_SOCK=$HOME/.ssh/agent.sock

ss -a | grep -q $SSH_AUTH_SOCK
if [ $? -ne 0 ]; then
    rm -f $SSH_AUTH_SOCK
    npiperelaypath=$(wslpath "C:/npiperelay")
    (setsid socat UNIX-LISTEN:$SSH_AUTH_SOCK,fork EXEC:"$npiperelaypath/npiperelay.exe -ei -s //./pipe/openssh-ssh-agent",nofork &) >/dev/null 2>&1
fi$HOME/npiperelay/npiperelay.exe above.
Exit and reopen your shell, and this should call out to npiperelay. There is no visual indication to know it’s working, you can only find out by testing it.
Test it
Assuming you’ve already added your public key to Github, do a quick test.
$ ssh -T [email protected]
Hi mendhak! You've successfully authenticated, but GitHub does not provide shell access.
All together in one script
Save this to a bash script and execute it. It should do all of the above steps including writing to ~/.bashrc.
cd ~

echo "Get npiperelay"
wget https://github.com/jstarks/npiperelay/releases/latest/download/npiperelay_windows_amd64.zip
unzip npiperelay_windows_amd64.zip -d $npiperelaypath
rm npiperelay_windows_amd64.zip

echo "Install socat"
sudo apt -y install socat

echo "Add to .bashrc"
cat << 'EOF' >> ~/.bashrc
export SSH_AUTH_SOCK=$HOME/.ssh/agent.sock

ss -a | grep -q $SSH_AUTH_SOCK
if [ $? -ne 0 ]; then
    rm -f $SSH_AUTH_SOCK
    npiperelaypath=$(wslpath "C:/npiperelay")
    (setsid socat UNIX-LISTEN:$SSH_AUTH_SOCK,fork EXEC:"$npiperelaypath/npiperelay.exe -ei -s //./pipe/openssh-ssh-agent",nofork &) >/dev/null 2>&1
fi
EOF

echo "Reload ~/.bashrc"
exec bash

echo "Done"
Troubleshooting Notes
Make sure the versions match
On Windows 11, you may also need to ensure that the OpenSSH versions match or are close enough. First, check the Ubuntu SSH version.
$ ssh -v localhost
OpenSSH_8.9p1 Ubuntu-3ubuntu0.1, OpenSSL 3.0.2 15 Mar 2022
On Windows 11 I’ve found the version of OpenSSH is a bit older so I’ve had to install a later, matching version using winget. In Powershell:
> winget install Microsoft.OpenSSH.Beta --version 8.9.1.0Once these versions were close enough, the SSH Agent started working.